- Updated: November 1, 2022
Chart of Accounts
This page covers how you can manage Charts of Accounts.
On This Page
Add Account to Chart of Accounts

-
1Click the “Pulse” icon (Productivity) on the left navigation menu.
-
2Click on “Financial Tools”. Click on the “Chart of Accounts” link.
-
3Click on the “+ Add” button in the upper right corner. Provide a name and account code for the account.
-
4Select the Account Category (i.e., Income or Expense -- if not in the dropdown list, choose “Add New”).
-
5Optionally, select a parent account. If you desire this account to be visible on your online giving form, check the “Accepts Giving” checkbox.
-
6If the amount didn't change when an adjustment was made, refresh the page for the new amount to reflect.
-
7Click the “Save” button.

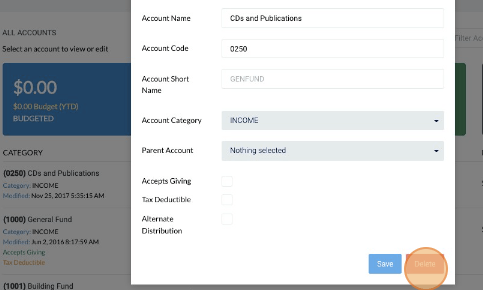
Edit Chart of Accounts
-
1Click the “Pulse” icon (Productivity) on the left navigation menu.
-
2Click on the “Financial Tools”. Click on the “Chart of Accounts” link.
-
3Open the Account you wish to edit by clicking the “Edit Account” button by the desired account name.
-
4Make desired changes and click the “Save” button.

Remove Account from Chart of Accounts
-
1Click the “Pulse” icon (Productivity) on the left navigation menu.
-
2Click on the “Financial Tools”. Click on the “Chart of Accounts” link.
-
3Open the Account you wish to remove by clicking the “Edit Account” button by the desired account name.
-
4Click the “Delete” button.